


ELISA Experimental Design: A Step-by-Step Guide & Key Considerations
 source:ELK Biotechnology
 date:2026-04-07
 views:499
ELISA Experimental Design: A Step-by-Step Guide & Key Considerations
Introduction: Why Do 90% of ELISA Failures Originate in the Design Phase?
This article systematically breaks down the complete workflow of ELISA experimental design, from theoretical frameworks to practical details, helping you avoid the most common pitfalls.
Step 1: Define Objectives & Scientific Hypothesis
● Clarify Core Questions: Specify the target analyte (e.g., human IL-6, mouse TNF-α), sample type (serum, plasma, cell supernatant, tissue lysate), and experimental purpose (absolute quantification, relative comparison, dynamic monitoring).
● Establish a Testable Hypothesis: Vague goals lead to vague results. Transform "I want to see changes in inflammatory factors" into:
"We hypothesize that LPS stimulation for 24 hours will increase IL-1β concentration in macrophage supernatant by at least 5-fold compared to the unstimulated control, and this effect will be blocked by over 50% with 10 μM Inhibitor X."
● Key Consideration: Focus on verifying one primary hypothesis per experiment. Incorporating too many variables on a single plate inevitably leads to insufficient statistical power.
Step 2: Sample Strategy Design
●Sample Type & Pre-treatment: Different samples require specific handling.
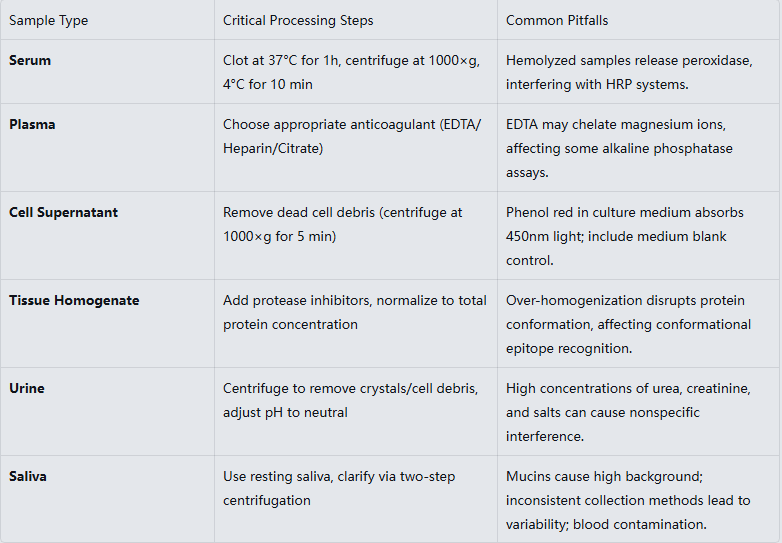
● Storage Guidelines: Samples should be clear. Centrifuge to remove particulates. Avoid hemolyzed samples. For short-term use (within 1 week), store at 4°C. For longer storage, aliquot and freeze at -20°C (use within 1 month) or -80°C (use within 3-6 months). Avoid repeated freeze-thaw cycles. Thaw samples at room temperature before use. Limit freeze-thaw cycles to ≤2; degradation of certain cytokines can reach 30% after the third cycle.
Step 3: Kit Selection & Validation
● Match Kit to Requirements: When selecting a kit, verify these five dimensions:
1.Species & Target Specificity: Confirm the kit recognizes your target protein in your species.
2.Detection Range: Ensure expected sample concentrations fall within the linear range of the standard curve (preferably in the middle section).
3.Sample Compatibility: Check if the kit's manual validates your sample type.
4.Sensitivity: Should be below 1/3 of your expected lowest concentration.
● Perform Pilot Validation:
● Standard Curve Linearity: Aim for R² > 0.99 (ideal).
● Intra-assay Precision: Replicate well CV < 10%.
● Spike Recovery Test: Add a known amount of standard to the sample. Recovery should be 80-120%.
Step 4: Plate Layout Design
● Control Setup: A complete ELISA should include 5 types of controls.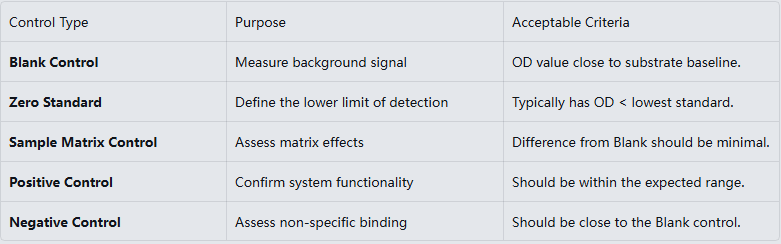
● Randomization & Blocking: Avoid placing all samples from the same group together. Use randomized assignment or at least distribute by block to minimize positional bias.
Step 5: Protocol Optimization
ELISA is a time-sensitive process. Example timeline for a two-step assay:
● 10:30-11:30: Equilibrate reagents/thaw samples, prepare standard dilutions, mark plate layout.
● 11:30-12:00: Add samples & standards.
● 12:00-13:20: Incubation (prepare wash buffer/detection antibody during this time).
● 13:20-13:30: Wash (tap plate firmly to remove residual liquid before washing. Add 200μL/well, soak for 60s, repeat 3 times).
● 13:30-14:20: Detection antibody incubation.
● 14:20-14:30: Wash (as above, 3 times).
● 14:30-15:20: Enzyme conjugate incubation (prepare fresh).
● 15:20-15:30: Wash (as above, but 5 times).
● 15:30-15:50: Add TMB substrate for color development (time precisely!).
● 15:50: Add stop solution. Read plate immediately on pre-warmed plate reader. Save and analyze data promptly.
Critical Operational Points:
● Pipetting: Use clean tips, dispense vertically to the bottom center of the well. Avoid touching the well wall or liquid surface to prevent carryover. Pipette slowly to avoid bubbles, which affect volume accuracy. Suggested order: Standards → Blank → Negative Control → Positive Control → Test Samples. Mix gently on a plate shaker (e.g., 500 rpm for 30s) after addition.
● Incubation: Strictly adhere to the temperature (e.g., 37°C, RT) and time specified in the kit manual. Seal the plate with adhesive film or seals to prevent evaporation. Incubate plates flat in the incubator; avoid stacking to ensure even temperature distribution.
● Washing: Fill each well completely with wash buffer. Ensure consistent soak time (typically 1 min). For manual washing, after decanting, firmly tap the plate dry on clean absorbent paper. For automated washers, perform regular maintenance to prevent clogging.
● Development & Stopping: Substrates (e.g., TMB) are light-sensitive; store protected from light and prepare fresh. Strictly control development time (typically 10-30 min). Preheat the plate reader for ≥10 min before reading for stability. Select the correct wavelength.
Step 6: Data Analysis Strategy
● Standard Curve Fitting: Use software (e.g., cvxpt32) for fitting. Key checkpoints:
1. R² value should be >0.99.
2. CV for standard replicates should be <10%.
Step 7: Troubleshooting Framework
When results are abnormal, follow this logical sequence:
● Signal Too Low? Check: Sample degradation? Antibody inactivation? Freshness of enzyme/substrate?
● Signal Too High? Check: Inadequate washing? Cross-reactivity? Hook effect (prozone effect)?
● Poor Reproducibility? Check: Pipetting accuracy? Incubation temperature uniformity? Washing consistency?
● Abnormal Standard Curve? Check: Dilution accuracy? Standard degradation? Appropriate fitting model?
Conclusion: Design Thinking Trumps Repetitive Labor
ELISA is not merely a mechanical procedure but a precision measurement system based on molecular recognition principles. Every design decision—from sample processing to the data analysis model—implicitly influences the final scientific conclusions. Mastering these design principles will grant you not just "publishable data," but reliable, reproducible, and profound insights into biological phenomena.

 RETURN